


Table of Contents
UGC NET Exam 2024 Admit Card Out: Steps to Download and Key Information
The University Grants Commission National Eligibility Test (UGC NET) is a crucial examination for those aspiring to qualify for the role of Assistant Professor or to secure Junior Research Fellowships (JRF) in Indian universities and colleges. As the 2024 exam date approaches, the release of the admit card marks a significant milestone for candidates. The admit card is a vital document that every candidate must carry to the examination center. Here’s a comprehensive guide on how to download the UGC NET Exam 2024 admit card, along with important information regarding the exam.
1. Understanding the UGC NET Admit Card
The UGC NET admit card is an essential document issued by the National Testing Agency (NTA), the organization responsible for conducting the UGC NET exam. It contains critical information about the candidate and the exam, including:
- Candidate’s name
- Roll number
- Exam date and time
- Examination center details
- Instructions for the exam day
- Photograph and signature of the candidate
The admit card serves as proof of registration and eligibility to appear for the examination. It is mandatory for candidates to carry it to the exam center along with a valid photo ID for verification purposes.
2. Steps to Download the UGC NET Exam 2024 Admit Card
Step 1: Visit the Official Website
- Open your preferred web browser and go to the official NTA UGC NET website: ugcnet.nta.nic.in.
- Ensure you are on the correct website to avoid phishing and other security risks.
Step 2: Locate the Admit Card Link
- On the homepage of the NTA UGC NET website, look for a notification or link related to the “UGC NET 2024 Admit Card” or “Download Admit Card.”
- This link is typically prominently displayed or found under the “Latest Updates” section.
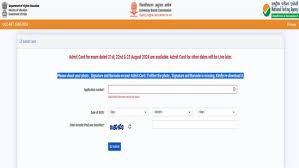
Step 3: Enter Your Details
- Click on the admit card download link, which will redirect you to a new page.
- You will be required to enter your application number and date of birth (DOB). These details are the same ones you used during the application process.
- Double-check the information you enter to ensure accuracy.
Step 4: Access and Download the Admit Card
- After entering your details, click on the “Submit” or “Download” button.
- Your admit card will appear on the screen. Review the information carefully to ensure that all details are correct.
- Download the admit card by clicking the download icon or button. Save the file in PDF format to your computer or device.
Step 5: Print the Admit Card
- After downloading, take a printout of the admit card on A4 size paper. It is advisable to print it in color to clearly display all the details.
- Make sure the printed admit card is legible and all information is clearly visible.
3. Important Information Regarding the Admit Card
1. Check for Errors
- Verify all details on the admit card, including your name, roll number, exam date, and center.
- If you notice any discrepancies or errors, contact the NTA helpline or support immediately to rectify them.
2. Instructions on the Admit Card
- The admit card will include specific instructions regarding the exam day, such as reporting time, prohibited items, and items to bring.
- Follow these instructions meticulously to avoid any issues on the day of the exam.
3. Documents to Carry
- Along with the admit card, carry a valid photo ID, such as an Aadhaar card, passport, driver’s license, or voter ID, as specified in the admit card instructions.
- Ensure that the ID you carry is the same as the one mentioned during the application process.
4. Contact Details for Issues
- For any issues related to downloading the admit card or discrepancies in the details, contact the NTA support team.
- The contact details are usually provided on the official website or in the exam notification.
4. Exam Day Preparations
1. Reach the Exam Center Early
- Arrive at the examination center well before the reporting time to avoid last-minute rushes and to complete the necessary check-in procedures smoothly.
2. Follow Safety Protocols
- Adhere to any safety and health protocols in place, such as COVID-19 guidelines, which may include wearing masks and using hand sanitizers.
3. Review Exam Guidelines
- Familiarize yourself with the exam guidelines, including the types of questions, duration, and marking scheme.
- Practice using mock tests or sample papers if available to build confidence.
5. Post-Exam Information
1. Exam Results
- After the exam, keep an eye on the official NTA UGC NET website for updates on result declarations.
- Results are typically announced a few weeks after the exam date.
2. Further Steps
- If you qualify for the exam, follow the instructions provided for further processes related to the Assistant Professor role or JRF.
- Stay informed about any additional requirements or documents needed for the next steps.
Conclusion
The UGC NET admit card is a critical document for candidates aspiring to qualify for the Assistant Professor role or secure a Junior Research Fellowship. By following the steps outlined above, candidates can easily download their admit card and ensure they are well-prepared for the examination.
The UGC NET exam is a significant milestone in the academic and professional journey of many candidates. Ensuring that you have your admit card and related documents in order is crucial for a smooth examination experience. Stay updated with any announcements from the NTA and follow all guidelines to maximize your chances of success.


